Case:
Jira supports sending automated emails (in our case the CSAT- Customer Satisfaction Survey) when the resolution status is set to Resolved. Just By enabling a property in the settings and then creating a rule all this can be done.
If this customer notification is disabled, customers will not receive the CSAT notification.
Solution:
- First, check if the CSAT settings is enabled (it's enabled by Default). To do that, follow the steps below:
- Go to Project Settings
- then Satisfaction Settings. (Located in the left panel)
- Check the Collect satisfaction (CSAT) feedback button if it's enabled and enable it if it's not.
- Now you need to create a Rule which sends a CSAT link to an external customer. Follow the steps below:
- In your Project Settings > Go to Automation.
- Click Create Rule
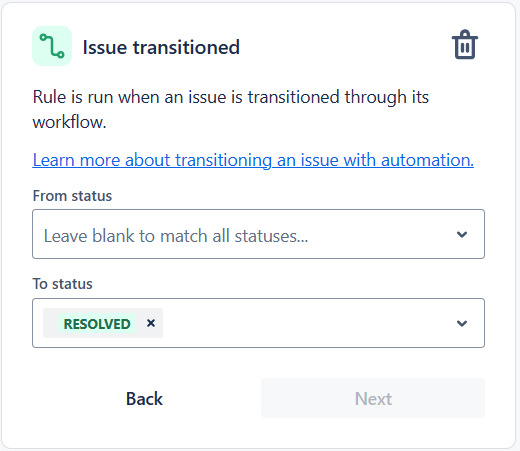
- In the "Add a Trigger" panel, search for "Issue Transition" and choose is as a trigger.
- Then choose Resolved status in the "To status" box (choose status where Resolutions are set)
- Now, after clicking on "Next", choose "THEN: Add an action" and search for "Send Web Request" action to generate a customer feedback token key.
- For the configuration, fill out as shown below:
- Web Request URL: https://<insert instance name>.atlassian.net/rest/api/3/issue/{{issue.key}}/properties/feedback.token.key
- Headers :
- Authorization: Basic <insert user_email_address:API_token encoded in Base64>
- Content-Type: application/json
- HTTP Method: PUT
- Web Request body: Custom Data
- Custom data:
{ "token": "test123", "issueID": {{issue.id}} } - Finally, check the Delay execution of subsequent rule actions until we've received a response for this web request box and save.
- Below, is a representation of the configuration mentioned above:

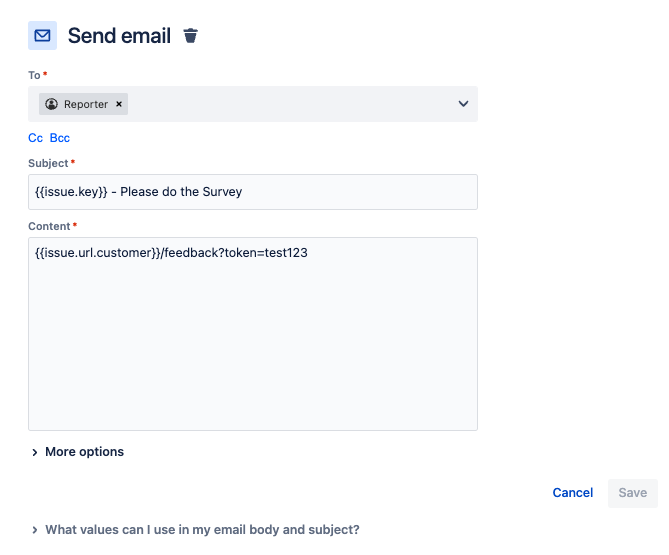
- After finishing up the "Send Web Request" configuration. Add a new action "Send Email".
- Set its configuration as below:
- To: Set the Reporter
- Subject: {{issue.key}} - Please do the Survey
- Content: {{issue.url.customer}}/feedback?token=test123
- After completing the configuration, Click on "Save".
- Finally, Click on "Turn on rule" and set rule name.
- For more instructions, you can follow this link here
Related Pages